Between the parens
A good REPL is a must, but just about half the story of a good Scheme
hacking environment. Well, perhaps a bit more than a half; but, at any
rate, one surely needs also a pleasant way of editing source code. Don’t
pay attention to naysayers: Emacs comes with an excellent editor
included for about any language on Earth, and just the best one when
that language is sexpy (especially if you use
Paredit).
Geiser’s support for writing Scheme code adds to Emacs’
scheme-mode, rather than supplanting it; and it does so by means
of a minor mode (unimaginatively dubbed geiser-mode) that defines
a bunch of new commands to try and, with the help of the same Scheme
process giving you the REPL, make those Scheme buffers come to life.
Activating Geiser
With Geiser installed following any of the procedures described in The quick and easy way or Installing from source, Emacs will automatically activate geiser-mode when opening a Scheme buffer. Geiser also instructs Emacs to consider files with the extension rkt part of the family, so that, in principle, there’s nothing you need to do to ensure that Geiser’s extensions will be available, out of the box, when you start editing Scheme code.
Indications that everything is working according to plan include the ’Geiser’ minor mode indicator in your mode-line and the appearance of a new entry for Geiser in the menu bar. If, moreover, the mode-line indicator is the name of a Scheme implementation, you’re indeed in a perfect world; otherwise, don’t despair and keep on reading: i’ll tell you how to fix that in a moment.
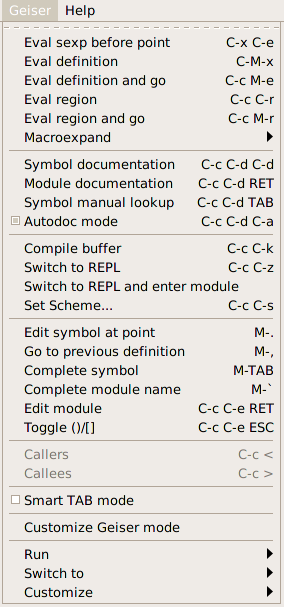
The menu provides a good synopsis of everything Geiser brings to the party, including those keyboard shortcuts we Emacsers love. If you’re seeing the name of your favourite Scheme implementation in the mode-line, have a running REPL and are comfortable with Emacs, you can stop reading now and, instead, discover Geiser’s joys by yourself. I’ve tried to make Geiser as self-documenting as any self-respecting Emacs package should be. If you follow this route, make sure to take a look at Geiser’s customization buffers (M-x customize-group RET geiser): there’s lot of fine-tuning available there. You might also want to take a glance at our cheat sheet.
Since geiser-mode is a minor mode, you can toggle it with
M-x geiser-mode, and control its activation in hooks with the
functions turn-on-geiser-mode and turn-off-geiser-mode.
If, for some reason i cannot fathom, you prefer geiser-mode not
to be active by default, customizing geiser-mode-auto-p to
nil will do the trick.
And if you happen to use a funky extension for your Scheme files that is not recognised as such by Emacs, just tell her about it with:
(add-to-list 'auto-mode-alist '("\\.funky-extension\\'" . scheme-mode))
Now, geiser-mode is just a useless wretch unless there’s a running Scheme process backing it up. Meaning that virtually all the commands it provides require a REPL up and running, preferably corresponding to the correct Scheme implementation. In the following section, we’ll see how to make sure that that’s actually the case.
The source and the REPL
As i’ve already mentioned a couple of times, geiser-mode needs a
running REPL to be operative. Thus, a common usage pattern will be
for you to first call geiser
(or one of its variants),
and then open some Scheme files;
but there’s nothing wrong in first opening a couple Scheme buffers and
then starting the REPL (you can even find it more convenient, since
pressing C-c C-z in a Scheme buffer will start the REPL for
you). Since Geiser supports more than one Scheme implementation, though,
there’s the problem of knowing which of them is to be associated with
each Scheme source file. Serviceable as it is, geiser-mode will try
to guess the correct implementation for you, according to the algorithm
described below.
If you find that Geiser is already guessing right the Scheme
implementation, feel free to skip to the next
subsection.
How Geiser associates a REPL to your Scheme buffer
To determine what Scheme implementation corresponds to a given source file, Geiser uses the following algorithm:
- If the file-local variable
geiser-scheme-implementationis defined, its value is used. A common way of setting buffer-local variables is to put them in a comment near the beginning of the file, surrounded by-*-marks, as in:;; -*- geiser-scheme-implementation: guile -*-
- If you’ve customized
geiser-active-implementationsso that it’s a single-element list (as explained in here), that element is used as the chosen implementation. - The contents of the file is scanned for hints on its associated
implementation. For instance, files that contain a
#langdirective will be considered Racket source code, while those with adefine-moduleform in them will be assigned to a Guile REPL. - The current buffer’s file name is checked against the rules given in
geiser-implementations-alist, and the first match is applied. You can provide your own rules by customizing this variable, as explained below. - If we haven’t been lucky this far and you have customized
geiser-default-implementationto the name of a supported implementation, we’ll follow your lead. - See? That’s the problem of being a smart aleck: one’s always outsmarted by people around. At this point, geiser-mode will humbly give up and ask you to explicitly choose the Scheme implementation.
As you can see in the list above, there are several ways to influence
Geiser’s guessing by means of customizable variables. The most direct (and
most impoverishing) is probably limiting the active implementations to a
single one, while customizing geiser-implementations-alist is the
most flexible (and, unsurprisingly, also the most complex). Here’s the
default value for the latter variable:
(((regexp "\\.scm$") guile)
 ((regexp "\\.ss$") racket)
 ((regexp "\\.rkt$") racket))
which describes the simple heuristic that files with .scm as
extension are by default associated to a Guile REPL while those ending
in .ss or .rkt correspond to Racket’s implementation (with
the caveat that these rules are applied only if the previous heuristics
have failed to detect the correct implementation, and that they’ll match
only if the corresponding implementation is active). You can add rules
to geiser-implementations-alist (or replace all of them) by
customizing it. Besides regular expressions, you can also use a
directory name; for instance, the following snippet:
(eval-after-load "geiser-impl"
  '(add-to-list 'geiser-implementations-alist
                '((dir "/home/jao/prj/frob") guile)))
will add a new rule that says that any file inside my /home/jao/prj/frob directory (or, recursively, any of its children) is to be assigned to Guile. Since rules are first matched, first served, this new rule will take precedence over the default ones.
A final tip: if you want Geiser to start automatically a REPL for you if
it notices that there’s no one active when it enters geiser-mode,
you can customize geiser-mode-start-repl-p to t.
Managing multiple scheme projects
By default, Geiser will re-use a single REPL for all buffers sharing the same scheme implementation. This works well enough in many cases, but may become problematic (or at least annoying) when working on multiple projects with separate dependencies and include paths.
Geiser provides optional support for using separate REPLs for each
project, which can be enabled by customizing
geiser-repl-current-project-function and selecting your Emacs
project-management library of choice (eg. project.el or
projectile). With this configured, if you want new REPLs to
automatically associate themselves with the current project, so that all
Geiser commands will ignore REPLs that are not associated with the
project, customize the toggle geiser-repl-per-project-p to
t and you’re all set up.
This can be very convenient when used with a .dir-locals.el in
the project root to set include paths, ensuring that Geiser REPLs will
always know where to find your project’s modules or dependencies.
Geiser automatically handles the common case of the project root
belonging to the load path: unless you tell it otherwise (using the
customisable flag geiser-repl-add-project-path-p, which defaults
to t), it will add the result of calling
geiser-repl-current-project-function to the REPLs load path on
startup.
Switching between source files and the REPL
Once you have a working geiser-mode,
you can switch from Scheme source buffers to the REPL or C-c
C-z. Those shortcuts map to the interactive command
geiser-repl-switch.
If you use a numeric prefix, as in C-u C-c C-z, besides being teleported to the REPL, the latter will switch to the namespace of the Scheme source file, as if you had used C-c C-m in the REPL, with the source file’s module as argument; cf. discussion in Switching context. This command is also bound to C-c C-a.
Once you’re in the REPL, the same C-c C-z shortcut will bring you back to the buffer you jumped from, provided you don’t kill the Scheme process in between. This is why the command is called geiser-repl-switch instead of switch-to-repl, and what makes it really handy, if you ask me.
If for some reason you’re not happy with the Scheme implementation that Geiser has assigned to your file, you can change it with C-c C-s, and you probably should take a look at the previous subsection to make sure that Geiser doesn’t get confused again.
A note about context
As explained before (see Modus operandi), all Geiser activities take
place in the context of the current namespace, which, for Scheme
buffers, corresponds to the module that the Scheme implementation
associates to the source file at hand (for instance, in Racket, there’s
a one-to-one correspondence between paths and modules, while Guile
relies on explicit define-module forms in the source file).
Now that we have geiser-mode happily alive in our Scheme buffers
and communicating with the right REPL instance, let us see what it
can do for us, besides jumping to and fro.
Documentation helpers
Autodoc redux
The first thing you will notice by moving around Scheme source is that, every now and then, the echo area lights up with the same autodoc messages we know and love from our REPL forays. This happens every time the Scheme process is able to recognise an identifier in the buffer, and provide information either on its value (for variables) or on its arity and the name of its formal arguments (for procedures and macros). That information will only be available if the module the identifier belongs to has been loaded in the running Scheme image. So it can be the case that, at first, no autodoc is shown for identifiers defined in the file you’re editing. But as soon as you evaluate them (either individually or collectively using any of the devices described in To eval or not to eval) their signatures will start appearing in the echo area.
Autodoc activation is controlled by a minor mode, geiser-autodoc,
which you can toggle with M-x geiser-autodoc-mode, or its associated
keyboard shortcut, C-c C-d a. That /A indicator in the
mode-line is telling you that autodoc is active. If you prefer that it
be inactive by default (e.g., because you’re connecting to a really
remote scheme and want to minimize network exchanges), just set
geiser-mode-autodoc-p to nil in your customization files.
Even when autodoc mode is off, you can use geiser-autodoc-show,
bound by default to C-c C-d s, to show the autodoc string for the
symbol at point.
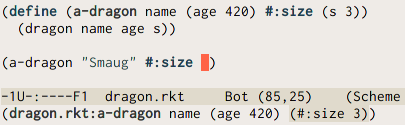
The way autodoc displays information deserves
some explanation. It will first show the name of the module where the
identifier at hand is defined, followed by a colon and the identifier
itself. If the latter corresponds to a procedure or macro, it will be
followed by a list of argument names, starting with the ones that are
required. Then there comes a list of optional arguments, if any,
enclosed in parentheses. When an optional argument has a default value
(or a form defining its default value), autodoc will display it after
the argument name. When the optional arguments are keywords, their names
are prefixed with “#:” (i.e., their names are keywords). An
ellipsis (…) serves as a marker of an indeterminate number of
parameters, as is the case with rest arguments or when autodoc
cannot fathom the exact number of arguments (this is often the case with
macros defined using syntax-case). Another way in which autodoc
displays its ignorance is by using an underscore to display parameters
whose name is beyond its powers.
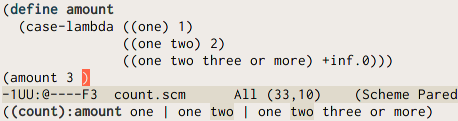
It can also be the case that a function or
macro has more than one signature (e.g., functions defined using
case-lambda, or some syntax-rules macros, for which Geiser
has often the black magic necessary to retrieve their actual arities).
In those cases, autodoc shows all known signatures (using the above
rules for each one) separated by a vertical bar (|).
As you have already noticed, the whole autodoc message is enclosed in parentheses. After all, we’re talking about Scheme here.
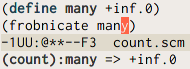
Finally, life is much easier when your cursor is on a symbol corresponding to a plain variable: you’ll see in the echo area its name, preceded by the module where it’s defined, and followed by its value, with an intervening arrow for greater effect. This time, there are no enclosing parentheses (i hope you see the logic in my madness).
You can change the way Geiser displays the module/identifier combo by
customizing geiser-autodoc-identifier-format. For example, if you
wanted a tilde surrounded by spaces instead of a colon as a separator,
you would write something like:
(setq geiser-autodoc-identifier-format "%s ~ %s")
in your Emacs initialisation files. There’s also a face
(geiser-font-lock-autodoc-identifier) that you can customize (for
instance, with M-x customize-face) to change the appearance of the
text. And another one (geiser-font-lock-autodoc-current-arg) that
controls how the current argument position is highlighted.
Other documentation commands
Sometimes, autodoc won’t provide enough information for you to understand what a function does. In those cases, you can ask Geiser to ask the running Scheme for further information on a given identifier or module.
For symbols, the incantation is M-x geiser-doc-symbol-at-point, or C-c C-d C-d for short. If the associated Scheme supports docstrings (as, for instance, Guile does), you’ll be teleported to a new Emacs buffer displaying Geiser’s documentation browser, filled with information about the identifier, including its docstring (if any; unfortunately, that an implementation supports docstrings doesn’t mean that they’re used everywhere).
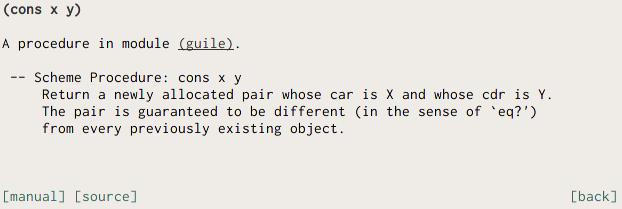
Pressing q in the documentation buffer will bring you back, enlightened, to where you were. There’s also a handful of other navigation commands available in that buffer, which you can discover by means of its menu or via the good old C-h m command. And feel free to use the navigation buttons and hyperlinks that justify my calling this buffer a documentation browser.
For Racket, which does not support docstrings out of the box, this command will provide less information, but the documentation browser will display the corresponding contract when it’s available, as well as some other tidbits for re-exported identifiers.
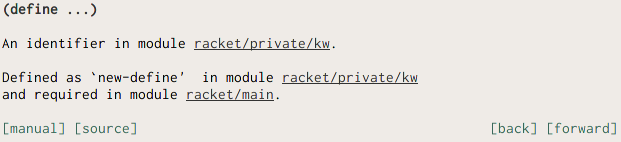
You can also ask Geiser to display information about a module, in the form of a list of its exported identifiers, using C-c C-d C-m, exactly as you would do in the REPL.
In both cases, the documentation browser will show a couple of buttons
giving you access to further documentation. First, you’ll see a button
named source: pressing it you’ll jump to the symbol’s definition.
The second button, dubbed manual, will open the Scheme
implementation’s manual page for the symbol at hand. For Racket, that
will open your web browser displaying the corresponding reference’s page
(using the HTML browser in Racket’s configuration, which you can edit in
DrRacket’s preferences dialog, or by setting
plt:framework-pref:external-browser directly in
~/.racket/racket-prefs.rktd), while in Guile a lookup will be
performed in the texinfo manual.
For Guile, the manual lookup uses the info indexes in the standard
Guile info nodes, which are usually named “guile” or “guile-2.0”.
If yours are named differently, just add your name to the customizable
variable geiser-guile-manual-lookup-nodes.
A list of all navigation commands in the documentation browser is available in our cheat-sheet.
You can also skip the documentation browser and jump directly to the
manual page for the symbol at point with the command
geiser-doc-look-up-manual, bound to C-c C-d i.
To eval or not to eval
One of Geiser’s main goals is to facilitate incremental development. You might have noticed that i’ve made a big fuss of Geiser’s ability to recognize context, by dint of being aware of the namespace where its operations happen.
That awareness is especially important when evaluating code in your scheme buffers, using the commands described below. They allow you to send code to the running Scheme with a granularity ranging from whole files to single s-expressions. That code will be evaluated in the module associated with the file you’re editing, allowing you to redefine values and procedures to your heart’s (and other modules’) content.
Macros are, of course, another kettle of fish: one needs to re-evaluate uses of a macro after redefining it. That’s not a limitation imposed by Geiser, but a consequence of how macros work in Scheme (and other Lisps). There’s also the risk that you lose track of what’s actually defined and what’s not during a given session. But, in my opinion, those are limitations we lispers are aware of, and they don’t force us to throw the baby with the bathwater and ditch incremental evaluation. Some people disagree; if you happen to find their arguments convincing, you don’t have to throw away Geiser together with the baby: M-x geiser-restart-repl will let you restart the REPL as many times as you see fit. Moreover, you can invoke geiser-compile-current-buffer and geiser-load-current-buffer with a prefix argument (that’d be something like C-u C-c C-k for compilation, for instance), to tell Geiser to restart the REPL associated with a buffer before compiling or loading its current contents.
For all of you auld bearded lispers still with me, here are some of the commands performing incremental evaluation in Geiser.
geiser-eval-last-sexp, bound to C-x C-e, will eval the
s-expression just before point. If you use a prefix, as in C-u C-x
C-e, besides evaluating it the expression is inserted in the the
buffer.
geiser-eval-definition, bound to C-M-x, finds the topmost
definition containing point and sends it for evaluation. The variant
geiser-eval-definition-and-go (C-c M-e) works in the same
way, but it also teleports you to REPL after the evaluation.
geiser-eval-region, bound to C-c C-r, evals the current
region. Again, there’s an and-go version available,
geiser-eval-region-and-go, bound to C-c M-r. And, if you
want to extend the evaluated region to the whole buffer, there is
geiser-eval-buffer, bound to C-c C-b and its companion
geiser-eval-buffer-and-go, bound to C-c M-b.
For all the commands above, the result of the evaluation is displayed in
the minibuffer, unless it causes a (Scheme-side) error (see To err: perchance to debug), or, for schemes supporting them (such as Racket),
the evaluation yields an image, in which case you’ll see it in popping
up in the Geiser debug buffer (if your Emacs runs under the auspices of
a graphical toolkit), or via an external viewer if you set
geiser-image-viewer to the path of an appropriate visualization
program (see also Seeing is believing for more on image support).
At the risk of repeating myself, i’ll remind you that all these evaluations will take place in the namespace of the module corresponding to the Scheme file from which you’re sending your code, which, in general, will be different from the REPL’s current module. And, if all goes according to plan, (re)defined variables and procedures should be immediately visible inside and, if exported, outside their module.
Besides evaluating expressions, definitions and regions, you can also macro-expand them. The corresponding key bindings start with the prefix C-c C-m and end, respectively, with C-e, C-x and C-r. The result of the macro expansion always appears in a pop up buffer.
All the evaluations and expansions performed by the commands above are
asynchronous2, so that
you can move around while the answer is being computed. The command
geiser-eval-interrupt, bound to C-c C-i will interrupt any
on-going evaluation and, when the scheme implementation supports a
debugger, bring you to a buffer where you can perform buffer actions in
the interrupted evaluation’s context.
Oh, didn’t i mention we have support for debuggers? Let’s talk about that next.
To err: perchance to debug
When an error occurs during evaluation, it will be reported according to the capabilities of the underlying Scheme REPL.
In most schemes, you’ll be presented with a backtrace, in a new buffer
where file paths locating the origin of the error are click-able (you
can navigate them using the TAB key, and use RET or the
mouse to jump to the offending spot; or invoke Emacs’ stock commands
next-error and previous-error, bound to M-g n and
M-g p by default).
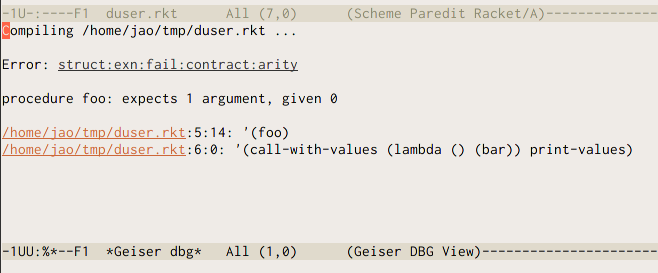
By default, Geiser will tele-transport your pointer to the debug buffer:
if you prefer to stay in the source buffer, set
geiser-debug-jump-to-debug to nil.
For schemes with good debug support (Guile is one), the debug buffers
offer a debugging menu, accessible via the , (that’s a comma)
key. If you press it, a transient menu will appear, offering you a
variety of actions, including showing local variable values or a more
detailed backtrace or frame display. This is the same interface you’ll
encounter the in case of interrupted evaluations, either by your
explicit C-c C-i command or because a breakpoint has been
previously set.
In addition, Geiser will sometimes report warnings for otherwise successful evaluations. In those cases, it won’t enter the debugger, just report the warnings in a debug buffer.
Jumping around
This one feature is as sweet as it is easy to explain: M-.
(geiser-edit-symbol-at-point) will open the file where the
identifier around point is defined and land your point on its
definition. To return to where you were, press M-,
(geiser-pop-symbol-stack). This command works also for module
names: Geiser first tries to locate a definition for the identifier at
point and, if that fails, a module with that name; if the latter
succeeds, the file where the module is defined will pop up.
Sometimes, the underlying Scheme will tell Geiser only the file where the symbol is defined, but Geiser will use some heuristics (read, regular expressions) to locate the exact line and bring you there. Thus, if you find Geiser systematically missing your definitions, send a message to the mailing list, and we’ll try to make the algorithm smarter.
You can control how the destination buffer pops up by setting
geiser-edit-symbol-method to either nil (to open the file
in the current window), 'window (other window in the same frame)
or 'frame (in a new frame).
Geiser writes for you
No self-respecting programming mode would be complete without completion. In geiser-mode, identifier completion is bound to M-TAB, and will offer all visible identifiers starting with the prefix before point. Visible here means all symbols imported or defined in the current namespace plus locally bound ones. E.g., if you’re at the end of the following partial expression:
(let ((default 42))
  (frob def
and press M-TAB, one of the possible completions will be
default.
After obtaining the list of completions from the running Scheme, Geiser
uses the standard Emacs completion machinery to display them. That
means, among other things, that partial completion is available: just
try to complete d-s or w-o-t-s to see why this is a good
thing. Partial completion won’t work if you have disabled it globally in
your Emacs configuration: if you don’t know what i’m talking about,
never mind: Geiser’s partial completion will work for you out of the
box.
If you find the M modifier annoying, you always have the option to
activate geiser-smart-tab-mode, which will make the TAB key
double duty as the regular Emacs indentation command (when the cursor is
not near a symbol) and Geiser’s completion function. If you want this
smarty pants mode always on in Scheme buffers, customize
geiser-mode-smart-tab-p to t.
Geiser also knows how to complete module names: if no completion for the prefix at point is found among the currently visible bindings, it will try to find a module name that matches it. You can also request explicitly completion only over module names using M-` (that’s a backtick).
Besides completion, there’s also this little command,
geiser-squarify, which will toggle the delimiters of the
innermost list around point between round and square brackets. It is
bound to C-c C-e [. With a numeric prefix (as in, say, M-2
C-c C-e [), it will perform that many toggles, forward for positive
values and backward for negative ones.
Caveat about completion
It is possible for Geiser to hang your Emacs process when trying to complete symbols. This can happen in the REPL itself or even in a Scheme buffer that is attached to the REPL process. For more details on how to fix this problem, Caveat about completion & the REPL